Recipes

Recipes

Theatre reviews

Recipes

Science of baking

Recipes

Bakery Reviews

Recipes (or add your own index title)

Cakes

Recipes (or add your own index title)

Biscuits

Recipes (or add your own index title)

Tarts, pies and other pastries

Recipes (or add your own index title)

Breads

Recipes (or add your own index title)

Others

Monday, 31 December 2012

Wheat flour in baking explained


Introduction
What we call flour in baking often refers to different blends of wheat flour. Wheat flour is produced as a powder by grinding cereal grains and is by far the most commonly and vastly produced flour for human consumption and this particular flour is the topic of this blog post. However, there will be future posts discussing the properties of other types of flours, including rye, corn, rice, potato, almond etc. But for now, let’s focus on wheat flour properties and its role in baking! The type or types of flour used in baking are mostly determined by 1: the quantity and quality of gluten content, 2: other ingredients that have been incorporated and 3: the fineness of the flour. So to understand flour, we need to understand gluten, what it is and what it does.
Gluten
Flours contain two main components, starch and protein. One protein in particular is highly abundant; this is gluten, which can form 7-14% of total protein content in wheat flour. Gluten is a viscoeleastic protein, and it literally means it has both elastic and viscosity properties. These properties are results of its composition from two different polypeptides or proteins, gliadin and glutenin. In broad terms, gliadin contributes towards the viscosity whilst glutenin provides elasticity. The physical properties of dough are partially dependent on the ratio between gliadin and glutenin level. However, it has been observed by others that the rheological properties (liquid, solid state) of dough are also dependent on the amount of water used, methods of mixing, mixing time and resting time, suggesting a set of highly complex chemical reactions in dough. It is speculated before the addition of water to the flour, gliadin and glutenin exist as separate proteins and in the presence of water they combine to form gluten. The general rule is, the higher the gluten content, the more strength it will provide to dough. How gliadin contributes to coeliac disease is also a heavily researched area, but we will not discuss this in this post.
What we have no control over
There are things we have absolutely no control over and this is the quality of wheat and the milling process. The conditions in which the wheat was grown in such as soil, light availability and nutrients all play a role in the growth of wheat and subsequently affect the quantity and quality of gluten present. The milling process, i.e. how the wheat was ground, can affect the degree of bran and endosperm (Fig 1) separation and the properties of the final product. However, these are all things we, as consumers have no control over and have to rely the manufacturers to do their job properly, but it is worth bearing these in mind when a new batch of flour you got does not perform as well as your previous one.

Common types of wheat flour
Strong (bread) flour
This is probably the flour that you can purchase that contains the highest percentage of gluten, at around 13% or even slightly higher in some cases. These are almost always made from hard wheat, i.e. wheat with a hard kernel or seed of the plant. The higher level of protein present also allows the protein strands to entrap more CO2 produced during the proofing
process by yeast.
Plain (all purpose) flour
This type of flour contains about 10-12% gluten and it’s the most versatile flour you will encounter (hence the name). It can be used for cakes, pastry and bread.
Self-raising flour
This flour is odd, it’s actually the same as plain flour but with about 2-2.5% (w/w) raising agents added to it to help with the rise of the batter.
Cake flour
This flour very often confuses people, many people believe it is the same as self-raising flour, but it’s not. It contains an even less gluten content compared to self-raising flour, which contains the same level of gluten as plain flour. Cake flour contains 7-9% gluten and in theory, should be finer than plain flour and the bran should be completely separated from the endosperm. Cake flours are normally bleached, which allows the cake to be lighter and a higher amount of sugar to be used. However, the use of many bleaching chemicals on flour is prohibited by the European Union.

That’s it for now, next time, I will be going through the raising agents in cakes, chemical structures and reactions, general proper science!

Monday, 24 December 2012

Bûche de Noël (Yule Log)

This is a simple recipe, it should work every time (famous last words I know, but let's hope not, it's christmas!). You only need very simple equipments for this, I actually went to my mum's and she barely has any baking equipment around, but it still turned out ok. This is a very nice alternative to traditional christmas pudding, which can be heavy and boozy, but if you are not a fan of those like me, then, please try this!

Ingredients 
  • 100g caster sugar
  • 4 large eggs
  • 60g plain flour
  • 40g coco powder
  • 400 ml double cream
  • 200g plain chocolate in small pieces (about 50% coco)
  1. Pre-heat oven to 200 degrees C (fan assisted) 
  2. Line 23 x 33 cm baking tray with baking parchment and push it down into the corners
  3. Sift and measure flour and coco powder and set aside
  4. Put sugar and eggs in a large mixing bowl and whisk with an electric whisk over a saucepan of simmering water, make sure the bottom of the bowl does not touch the hot water
  5. Whisk until the eggs become a very light pale yellow and thick enough to leave a trail behind when you lift the whisks out of the egg
  6. Very gently fold in the flour and coco powder with a metal spoon until they have evenly incorporated into the egg
  7. Spread mixture onto the baking tray 
  8. Bake in pre-heated oven for 10-12 minutes, or until risen and sponge springs back when touched lightly with a finger in the middle 
  9. Let sponge cool down slightly in tray for 5 minutes and lift it out of the tray
  10. Tip the sponge upside down onto another sheet of baking parchment paper and carefully lift off the parchment paper on the other side
  11. Trim off 1cm of sponge from all 4 sides of the sponge
  12. Cut with a sharp knife about 1cm in on the length of the sponge from one end, do not cut all the one through, half way would do
  13. Use parchment paper to roll in the slightly cut end to start the rolling process and tightly roll the rest
  14. Let it rest in that position for 10 minutes
  15. Meanwhile prepare chocolate ganache by heating 200ml double cream until boiling and then take it off the heat and let it cool down for 3-5 minutes
  16. Pour hot cream over chocolate and stir until chocolate has melted and let it cool down until room temperature
  17. Carefully unroll the log and let it cool down in that orientation
  18. One roll has cooled down completely, whip the rest of the double cream until still peaks and spread across the inside of log and roll up the log again and trim off a bit from either end of the log
  19. Cut about 8-10cm from one of the log diagonally and place it on the side of the other roll 
  20. When the ganache has thickened, spread a generous amount evenly over all sides of the roll including the 2 ends
  21. Use the end of clean stick/fork/spoon or anything to make longitudinal longs across the length of the logs and swirls at the ends to create the bark effect 
  22. Dust with either icing sugar or chopped white chocolate for snowy effect 
This recipe is entered to classic french challenge a thttp://bluekitchenbakes.blogspot.co.uk

Friday, 14 December 2012

Chocolate chestnut chiffon cake (CCCC)

Again, another chiffon cake, but this time, I used the chiffon for a reason, not just because I love it! The main character of this cake is the chestnut, first it's in season and second it's also festive as we are approaching christmas! However, one thing to be aware of is that chestnut flavour can be quite subtle and you can't really combine it with heavy flavours as they WILL mask the chestnut completely and this is the reason I have chosen a plain vanilla chiffon. When done right, not only can you taste it, but you can also smell the sweet aroma of the chestnut too! 

Ingredients
  • 115g self raising flour
  • 1/2 tbsp baking powder
  • 3 tsps pure vanilla essence 
  • 170g caster sugar (put 90g, 30g and 50g into 3 separate bowls)
  • 3 egg yolks
  • 4 egg whites
  • 80 ml cold water
  • 90 ml vegetable oil
  • 250g chestnut (sainsbury's whole chestnuts cooked and peeled works great)
  • 400ml double cream
  • 1 tbsp dark rum
  • 50g milk chocolate
  • 20g white chocolate
  • 50g dark chocolate
  1. Pre-heat oven to 170 degrees C and grease an 8 inch tin with unsalted butter
  2. Sift and weigh flour, baking powder and 90g caster sugar and mix together
  3. Add 2 tsps vanilla essence, egg yolks, water and vegetable oil to the flour and mix with metal spoon until a runny creamy mixture
  4. Whisk with electric whisk egg whites  until soft peaks and gradually add sugar from 50g one tbsp at a time to egg white until it forms firm peaks and glossy
  5. Gently fold in a third of meringue into the cake batter at a time until all the meringue has been folded in
  6. Pour cake mix into baking tin and bake for 60-70 minutes. The surface should start to brown, but don't worry, it's supposed to. Turn the cake upside down immediately when it's out of the oven to prevent collapsing It is better that it is slightly brown as it will prevent the sponge to fall out of the cake tin when it's turned upside down
  7. When the cake is completely cool (I usually just leave it upside down for 2 hours, start preparing chestnut cream at this stage), use a sharp knife and cut the edges of the cake to get it out of the cake tin
  8. Cut the sponge horizontally with a sharp knife to divide the sponge in half for when the fillings are ready
Chestnut cream (creme aux marrons) 
  1. Put chestnut and 200ml double cream and 20g caster sugar into a saucepan and heat over medium heat with occasional stir with wooden spoon
  2. The cream should start to boil and thicken, add the rum and 1 tsp vanilla essence and let it simmer for a 2-3 minutes on low heat
  3. Crush the chestnuts and mash them up slightly (it's almost like making potato mash)
  4. Puree the chestnut cream with a electric blender, you can make it very smooth or leave some small lumps in (I actually prefer them with small lumps, but some people will prefer a smoother finish)
  5. Whisk 100ml double cream until it thickens and spread a thin layer of cream across the inside of the sponges and put a very generous amount of chestnut cream on top of the double cream (I had about 5 mm high chestnut cream as the filling) and then put another layer of whisked double cream on top of chestnut cream
  6. Put the other sponge on top 
  7. Use remaining chestnut cream to cover the top and sides of the cake, smoothen it with a palate knife
Decorations
  1. Make chocolate decorations by melting dark chocolate over a pan of simmering water and pipe it into any shape you want on a piece of parchment paper and let it cool in the fridge for at least 1 hour, you may even want to make tempered chocolate, but I haven't tried that yet myself
  2. Make milk chocolate ganache by melting the milk chocolate (cut into small chunks) in 50ml of hot double cream and let it cool slightly, do NOT add any sugar
  3. Pour over the top of cake to get a smooth finish 
  4. Melt white chocolate over simmering water and pipe a swirl on the surface of the milk chocolate ganache
  5. Use the tip of a blunt knife to run in and out of the white chocolate swirl to create a lovely flowery pattern
  6. Lift the dark chocolate patterns off parchment paper and stick them onto the sides 

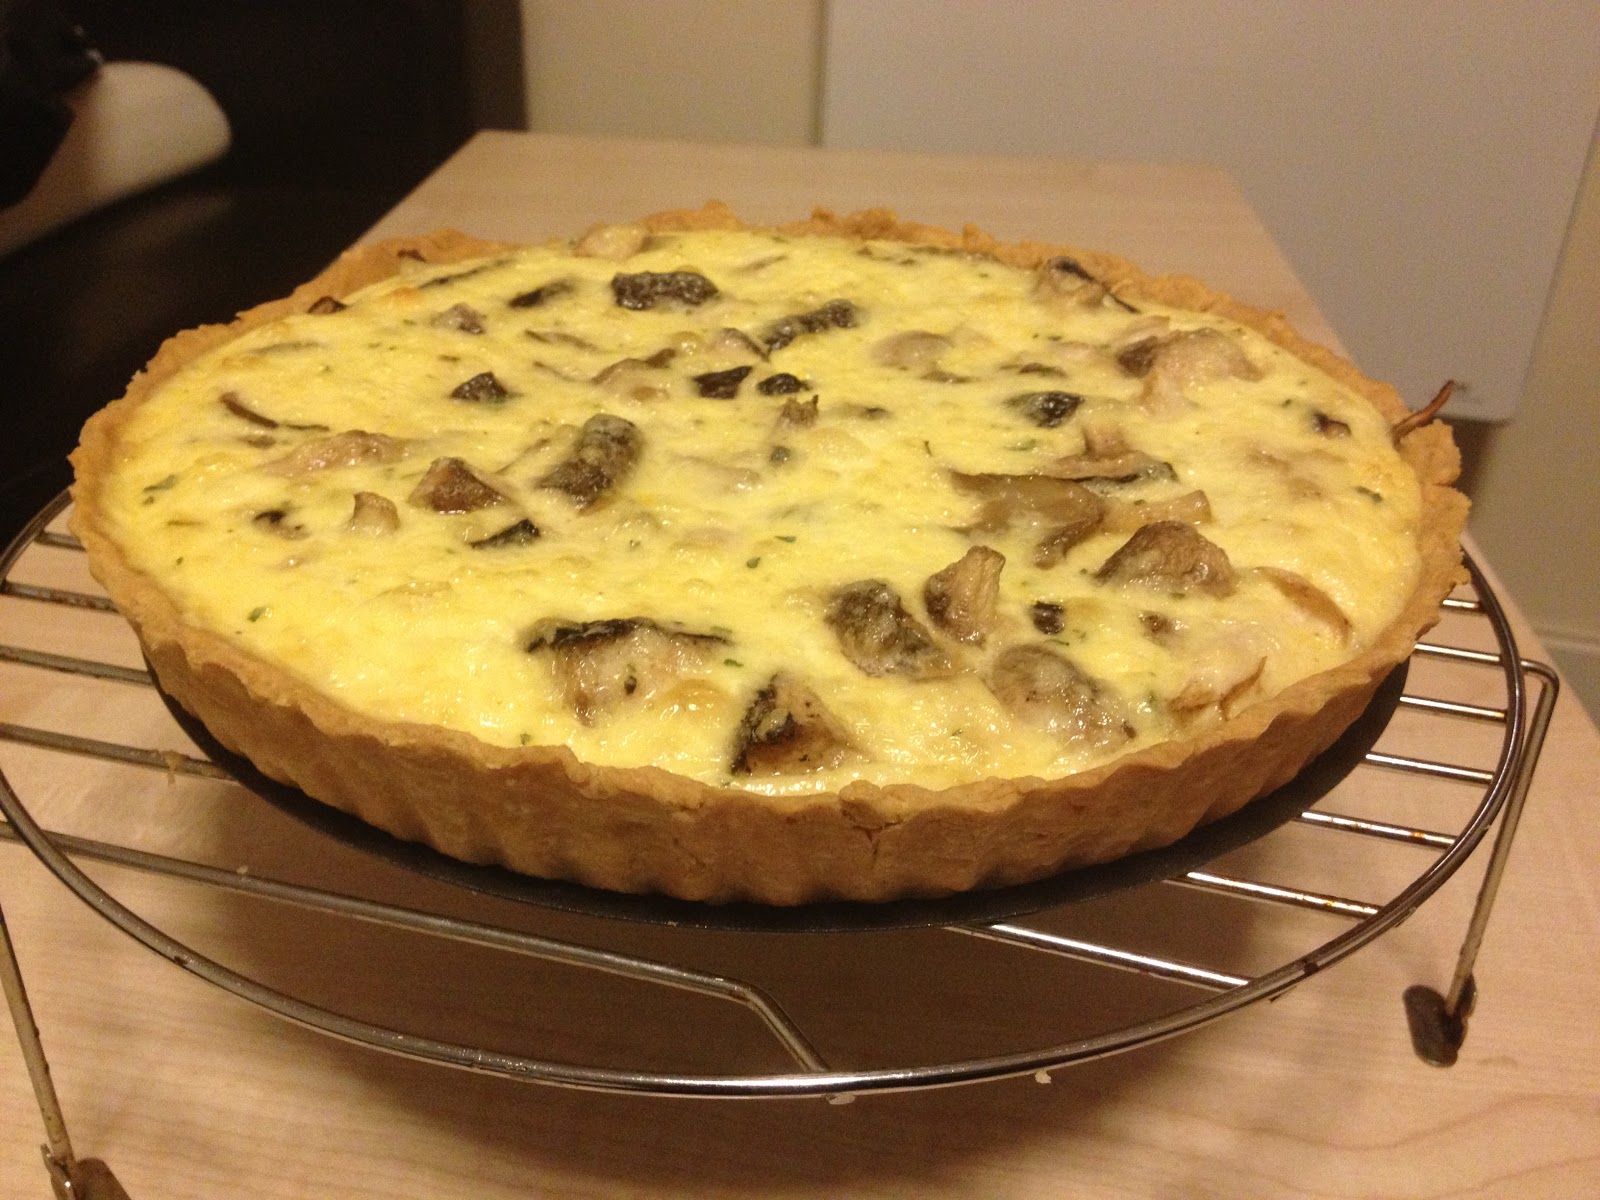
Garlic mushroom and walnut quiche

This quiche is rather simple to make but it's packed with flavour, texture and a lovely fragrance. To give it a bit more texture and substance due to the fact that it lacks meat, I have used oyster mushrooms and small pieces of walnut to give the fillings some crunch. The quiche can be served warm or cold, in fact, the fragrance of the shiitake mushroom develops somewhat in the cold quiche. But I like it warm. 

Ingredients
  • 250g plain flour
  • 150g unsalted butter
  • 3 large eggs
  • 1 tbsp milk 
  • 8 large closed cup mushrooms
  • 15 medium size shiitake mushrooms 
  • 12 oyster mushrooms 
  • 40g walnut
  • salt and pepper for seasoning 
  • 284ml double cream
  • 2 tsp ground garlic / 2 fresh garlic cloves
  • 2 tsps parsley
  • 110g guryere cheese, finely grated
  1. Pre-heat oven to 200 degrees C
  2. Rub flour and butter together to form bread crumb structures
  3. Add 1 egg and milk to flour and combine to form a dough 
  4. Roll out the dough on a lightly floured surface to about 2-3mm thick
  5. Place pastry into a flan tin and prick numerous holes at the bottom with a fork
  6. Chill in the fridge for 30 minutes, this should reduce the amount of shrinkage when baked
  7. Cover pastry with a sheet of parchment paper and baking beans
  8. Blind bake the pastry for 15 minutes, take it out and trim off the edges to make a nicer finish
  9. Return to oven and bake for another 10 minutes to see if the bottom of pastry is dry, if not bake for another 10 minutes and check again
  10. When the base of pastry is completely dry, remove baking beans and parchment paper and bake for 10 minutes
  11. Take the pastry out and let it cool slightly whilst preparing fillings
  12. Rinse clean the mushrooms and slice the closed cup and shiitake mushrooms up into rather thick slices and just leave the oyster mushrooms as they are
  13. Heat mushrooms up over medium heat, sprinkle salt, pepper and 1 tsp of ground garlic/ finely grated garlic from 1 clove over the top and mix thoroughly, do not use any oil
  14. When you can start to smell the shiitake mushrooms and the closed cup mushrooms are starting to reduce in size, take them off the heat and let it cool down, drain excess fluid from mushrooms with a clean piece of kitchen paper 
  15. Beat 2 eggs and the cream together and then fold in the cheese
  16. Put in 2 pinches of salt, sprinkle of pepper, remaining garlic and parsley into the egg mix to season
  17. Wash and break walnut up into small chunks and fold them in to the egg/cream mixture
  18. Place the mushrooms into the bottom of the baked pastry case 
  19. Place egg mix over mushrooms evenly
  20. Bake at 200 degrees C for 25-30 minutes 
  21. Serve warm or cold (preferably warm)

Monday, 26 November 2012

Le chocolat chaud (parisian hot chocolate)

Chocolat chaud, or hot chocolate is consumed across the world and all hot chocolate lovers should know not to buy the powdered hot chocolate that you just add hot milk to! Honestly, there is no point in having those rubbish hot chocolates (if you can call them hot chocolates at all) when a nice one can be made in 5 minutes! Follow this very simple recipe to make your own very delicious chocolat chaud! 

Ingredients 
  • Milk (full fat or semi-skimmed)
  • single cream
  • Plain cooking chocolate
  • Milk cooking chocolate
  • granulated sugar (optional)
  • A small saucepan 
  1. Fill 3/4 of your mug with milk and then top up ALMOST to the top with single cream (with maybe 2-3cm spare)
  2. Pour milk and cream into a saucepan and put it over low heat
  3. When it starts to steam up, put the plain and milk chocolates into the hot milk. How much you need depends on your mug size. BUT, I think the golden ratio is 5:1 plain chocolate to milk chocolate. So let's say you are using 30g plain chocolate, then you will use 6g milk chocolate
  4. For a mug roughly to the one I used in the picture, you will need about 25g plain chocolate and 5g milk chocolate 
  5. Stir the mixture with a wooden spoon or plastic whisk continuously until the chocolates have all melted, this should be fairly quick, my chocolates were melted within 30 seconds. But you want to keep whisking until the texture turns smooth, which will take another minute or two
  6. Now pour the chocolat chaud into your mug and voila! Your delicious hot chocolate! I actually put in half a tsp of sugar at this point as I like my hot chocolate quite sweet, but this is completely optional!
Link to recipe of the soufflé in this photo: http://bakingscience.blogspot.co.uk/2012/09/lemon-and-citrus-honey-souffle.html


Saturday, 24 November 2012

Mixed fruit genoise cake

This cake is not special, and I mean it's NOT special at all. There's nothing new about this cake when compared to the rest of the blog posts. But I think there is a take home message from this, don't use mango to make mousseline, it just doesn't work! Most of the mango flavour goes when heated and you are just left with a sour-ish custard! I had to resort to shoving lots of mango chunks into the filling to make it mango-y. 

This recipe is for an 8 inch cake tin. 
Ingredients (genoise sponge)
  • 110g self raising flour
  • 110g caster sugar
  • 4 medium eggs
  • 45g unsalted butter
  1. Line an 8 inch baking tin with parchment and pre-heat oven to 180 degrees C
  2. Measure flour and set aside
  3. Heat butter until melted and set aside to cool down for at least 20 minutes
  4. Beat sugar and eggs together in a large mixing bowl briefly
  5. Now whisk eggs with an electric whisk over a pan of simmering water until it has more than doubled in volume and when whisk is lifted off the batter, it leaves a thin trail behind
  6. Fold in flour and butter separately, careful not to lose too much volume in the cake batter
  7. Bake for 35-40 minutes, it's done with a knife comes out clean (start preparing mousseline during baking)
  8. Cool in tin for 5 minutes and then take cake out to cool down completely
Ingredients (mango mousseline)
  • 450g mango chunks
  • 30g caster sugar
  • 2 large eggs
  • 4 tbsps corn flour (about 20-25g)

  1. Puree the mango chunks and heat the puree over low heat
  2. Beat sugar and eggs together until smooth
  3. Add corn flour to eggs and beat again until smooth
  4. When puree starts to simmer, add a tbsp to your egg mixture and whisk, then add another tbsp and repeat the whisking, continue until the paste starts to get runny
  5. Pour the egg flour mix into the rest of the puree and continue whisking to prevent the eggs from cooking and put it on low heat until it boils, again continue whisking throughout
  6. When it boils, continue heating and whisking for 2 more minutes and the mixture should thicken considerably
  7. Take the mousseline off the heat and let it cool to room temperature
Assembly
  1. Cut genoise sponge horizontally into 2 halves
  2. Pipe 2/3 of mousseline into the middle of the sponges as filling, don't try to spread this, it's too thick for spreading I think, you'll risk breaking the delicate sponge if you attempt to spread it too hard
  3. Use the remaining mousseline and fruits such as melon, remaining mango and strawberries to decorate the top
Special tips
I really would avoid using mango for the mousseline, the flavour just goes, not diminishes, it goes pretty much completely. Try using another fruit, I've tried melon before and that's fine, I reckon pineapple would be ok too. Try not to use canned fruits, as the resulting mousseline just don't taste as nice! 

Thursday, 22 November 2012

chocolate and strawberry mousse chiffon cake

This is just like the previous chiffon I've blogged about. It's a light and airy cake (if it rises well) and I think it's an absolutely delight. Though I admit I find the chocolate chiffon harder to make than the lemon one. Maybe I'll try a different recipe for this next time, but for now, this works well! So, this is a chocoalte chiffon, with a thick supportive layer of strawberry mousse in the middle, lots of ganache on top and chocolate bits around the side. My piping is rubbish as per always, but it says  "Congratulations Dr Gammons" for a friend who will be passing her PhD viva today (SO EXCITED for her actually). 

Ingredients (Chocolate chiffon)
  • 125g self raising flour
  • 150g + 50g caster sugar (in separate bowls)
  • 4 egg yolks
  • 5 egg whites
  • 80ml vegetable oil
  • 50ml cold water
  • 1 tbsp baking powder
  • 25g coco powder
  1. Grease 23cm (9 inch) baking tin with butter and pre-heat oven to 170 degrees C
  2. Sift and mix flour, coco powder, baking powder and 150g caster sugar together
  3. Add water, oil and egg yolks to the mix and whisk until smooth
  4. Now beat the egg whites until foamy, then add 1 tbsp of the remaining 50g caster sugar at a time to it until it forms soft peaks and glossy
  5. Add 1/3 of meringue to cake mix and fold it in, then add the rest of the egg whites to it and gently fold in the rest 
  6. Pour cake mix into baking tin (put it as close to tin as possible to prevent the batter dropping from a great height, this should help to keep some of the air in)
  7. (I melted the dark chocolate and piped it to form the side structure onto a baking parchment at this stage and put it into the fridge to set)
  8. Bake for 60-70 minutes, it should almost double in height and when tested with a clean skewer, it should come out clean as per usual 
  9. Tip the tin upside down with cake inside and let it cool upside down on a wire rack for 40 minutes
  10. When it has cooled, cut it horizontally into 2 equal sponges
Ingredients (strawberry mousse)
  • 250g strawberries
  • 150ml double cream
  • 30g caster sugar
  • 30g corn flour
  1. Puree the strawberries 
  2. Add sugar to strawberry puree and put it over medium heat until it boils
  3. Add 1 tbsp of strawberry puree at a time to corn flour and mix the flour in
  4. Put the mixture back into saucepan and stir continuously until it thickens
  5. Leave it aside to cool down
  6. Whisk double cream until it thickens and sort of stiff 
  7. Fold in strawberry into the thickened cream
Assembling the cake
  1. Fill bottom sponge with half of strawberry mousse
  2. Half strawberries and lay them on top of the mousse and cover them remaining mousse
  3. Put the other half of cake on 
  4. Make the ganache (in MANY of my previous posts, you will need about 250g dark chocolate for this one) and let it cool down slightly for 10 minutes and pour about 1/3 over the top to make a smooth finish. Let the remaining ganache to cool further for 30-40 minutes or until it is more of a paste in structure and COMPLETELY COOL! Spread that across the side of the cake to hide the filling and also act as the sticking agent for the chocolate structures on the side
  5. Use a sharp knife to cut up the chocolate structure and stick them onto the chocolate ganache on the side of the cake, that is why it's important your ganache is cool, or it will melt the chocolate structures. Also, it's important to know, the ganache is FAR less sticky when it has completely cooled after a few hours, so if you stick the chocolate on now, they will stay on. But if you do them later, they won't stick
  6. Now the cake can go into the fridge until next morning if you want
  7. Melt some milk chocolate and pipe the message onto the cake and decorate with strawberries! YAY, FINISHED!


Monday, 19 November 2012

Orange souffle cheesecake


This is a VERY fluffy and soft cheesecake. So, it's quite different to the normal and heavier baked or unbaked cheesecakes that we are used to. And I think most people, including myself would have never ever associated a cheesecake with this kind of texture. However, unlike a traditional cheesecake, where you get a buttery biscuit base, the souffle cheesecake does not usually have a biscuit base at all (not that I'm aware of anyway). 

You can add all sorts of flavours to it as well just like a conventional cheesecake, but you need to be aware of the extra moisture you're putting in as that may affect the cake's final texture. The ingredients for this cake is for an 8 inch cake tin, so adjust your ingredients accordingly depending on the tin you have.

Ingredients
  • 200g cream cheese
  • 50g plain flour
  • 15g corn flour
  • 40g unsalted butter
  • 5 eggs, separated 
  • 120g caster sugar
  • 80ml milk (full fat or semi-skimmed)
  • 1 large orange
  • 150g plain chocolate for decoration 
  1. Heat cream cheese, butter and milk together until everything has melted
  2. Sift the mixture to remove any lumps and let it cool to room temperature for 40-50 minutes
  3. Pre-heat oven to 160 degrees C and line an 8 inch baking tin with parchment paper
  4. Add all the egg yolks, zest from the whole orange and juice from half an orange to cheese mixture and whisk until smooth
  5. Sift plain and corn flour into cake batter and whisk until combined
  6. Measure caster sugar and set it aside 
  7. Whisk egg white with electric whisk until foamy and add 1 tbsp of sugar to it at a time until all the sugar has been added and the egg white forms stiff peaks
  8. Add a quarter of the egg white to cake mix and whisk together
  9. Add the rest of the egg white to the cake mix and fold in the egg white gently, avoid bursting any air bubbles trapped inside the egg white
  10. Bake for 75-90 minutes (Some would suggest a bain marie with this to avoid a cracked surface, but I didn't think that was a problem)
  11. The cake is done when a knife comes out clean when poked inside 
  12. Let is cool down very gradually inside the oven for 30 minutes. Then open the oven door slightly and let it cool down for another 2 hours before taking it out of the oven
  13. Whilst cooking the cake, prepare chocolate decoration, melt chocolate over simmering water and pipe it randomly to form a fenced structure onto a baking parchment and let it cool down in the fridge for at least 3 hours 
  14. Decorate cake with chocolate and orange slices when it has cooled down completely to room temperature 

Sunday, 11 November 2012

chestnut loaf cake with caramelised nuts

Did you notice a massive chunk at the end of this cake is missing? Well, I cut a slice off and ate that before I remembered I forgot to take a photo for the blog. And the cake is not actually that yellow/golden, special effect of the sunlight from the window making it look sparkly! 

Ingredients
  • 110g plain flour
  • 110g caster sugar
  • 140g unsalted butter
  • 1 tsp baking powder
  • 6 medium sized chestnuts
  • 3 large eggs
  • 3 tbsps milk 
  • about 100-120g nuts, chopped into small pieces (I used walnut, cashew nut and pistachio)
  • 100g white granulated sugar
  • 30g butter
  • 3 tbsp water
  1. Pre-heat oven to 180 degrees C and line loaf tin with baking parchment
  2. Sift and mix flour, caster sugar and baking powder together 
  3. Cream the dry ingredients together with the butter, make sure the butter is at room temperature
  4. Beat the eggs and milk together until silky, no need to over whisk this
  5. Mix in a third of the egg into the cake mix and fold it in, then add in the rest and mix well
  6. Chop cooked and peeled chestnuts into small pieces and mix them into the cake batter
  7. Pour the mixture into loaf tin and bake for 30 minutes, the batter should start to become firm, but the inside is not cooked completely yet
  8. When the cake has been baked for 20 minutes, start measuring white granulated sugar and put into a saucepan with 3 tbsp water and give it a good stir  with wooden spoon at low-medium heat
  9. Take away spoon and let it boil without any stirring (N.B. very important, do not stir, or the sugar will crystallise and you will have to make it again)
  10. Watch your caramel like a hawk, it can go from clear to amber quite quickly and once it is amber it can turn into a brown colour and become burnt within a minute
  11. When the caramel is a golden/dark amber colour, but not brown, take it off the heat and add the butter to it
  12. Let the butter melt without stirring
  13. Once butter has melted, add in the chopped nuts and stir to coat nuts with caramel
  14. Quickly lay the caramelised nut onto the cake and continue baking for another 15-20 minutes 
  15. Take cake out of oven and test with a clean sharp knife, it should come out completely clean when it's done

Mint and fresh berries tartlets


This is a refreshing and not too heavy dessert that is great for mid afternoon tea. Or you can have it any time of the day, it really does fit in any time. The recipe to this is simple, most of which have been covered in previous blog posts. But there are slightly variations. 

Ingredients shortcrust pastry, makes about 6 tartlets)
  • 175g plain flour
  • 100g unsalted butter
  • 30g icing sugar 
  • 1 large egg yolk
  • 1 tbsp cold water
  1. Rub flour, sugar and butter together until it resembles breadcrumb structure
  2. Add in egg yolk and water and knead until combined, you can overwork this, so watch out not to knead it for too long and too hard
  3. Chill in the fridge for 30 minutes
  4. Pre-heat oven to 200 degrees C 
  5. Lightly flour bench top and rolling pin and roll out the pastry very thin (about 2-3mm)
  6. Get a circular cutter and cut out the pastry and put it into the tartlet tins
  7. Gently push the sides in with a piece of spare dough, if the pastry broke, don't worry, you can just stick some spare over and push it in gently to fill in the hole
  8. Use a fork to prick a few holes at the bottom of the tartlets 
  9. Put a piece of baking parchment over the pastry and put baking beans on top 
  10. Blind bake for 15 minutes and then take out the baking beans
  11. Bake again for 10 minutes
  12. Take the tartlets out and cool in the tins 
Ingredients (creme patissiere)
  • 4 large egg yolks
  • 100g caster sugar
  • 6 stalks of fresh mint leaves
  • 260ml milk (semi-skimmed or full fat)
  • 25g corn flour
  1. Whisk egg yolks and caster sugar together until creamy
  2. Add in corn flour and whisk until smooth
  3. Chop mint stalks into approximately 2cm long pieces and heat them in the milk over medium-low heat, switch off heat when the milk boils
  4. Leave it to cool down for 5 minutes
  5. Sift milk into the egg/sugar/corn flour mixture and whisk while you put the milk in 
  6. Pour the cream back into saucepan and put it on medium-low heat, continue whisking with wooden spoon/whisk whilst heating (this is important, or your eggs will get cooked and form lumpy bits)
  7. When the creme patissiere boils, keep whisking until it thickens, this can take 1-2 minutes
  8. Once the creme patissiere has thickened, take it off the heat and let it cool down to room temperature
  9. Pipe the creme patissiere over the bottom of the tartlets until it is completely filled
  10. Decorate the top with strawberries, raspberries and blueberries, either whole or sliced, decorate however you want